Thursday, April 13, 2023

Access Control

 Role-based Access Control (RABC)

RABC is an access control model that organizes user into roles and assign permissions to each role as appropriate

Authentication vs Authorization

Pega platform implementation of Role-based access control is based on two factors: Authentication and Authorization

  • Authentication - Confirms the identity of the user by validating                     login credentials (Operator ID record)
  • Authorization - Determines the applications that the user can                      access (Access Group record lists the any                          authorized applications and roles assigned to the                  members of the access group)

Role-based access control record types 

The RBAC model provides several types of records that are used to configure behavior satisfying access control needs.

  • Access Group - Identifies the application, default portal and assigned access roles for group of users
  • Role - Maintains a list of all access records associated with a role 
  • Access Deny - Restricts user access under certain conditions
  • Access of Role to Object (ARO) - Specifies the permissions that are granted to a role and access class
  • Class - Defines a collections of objects that are available to other classes or to instances of the class
  • Privilege - Associates an access role with a rule that needs to be secured
  • Rule - Defines the behavior of an application by serving as a building block

Important Notes : - if ARO and access deny records are defined for the same combination of role and class, the settings on the access deny record override the settings on the ARO.

A privilege record is used control access to a specific rule. Most rules list any required privileges in the security tab of the rule form. Flow rules list the required privileges in the process tab.

Privilege record acts as a token. To grant privilege to a role add the privilege record to the appropriate ARO.
Privileges are considered during the rule resolution process, but only after a candidate rule has been added to the rules cache. If users attempt to run a rule without a required privilege, the applications returns an error.


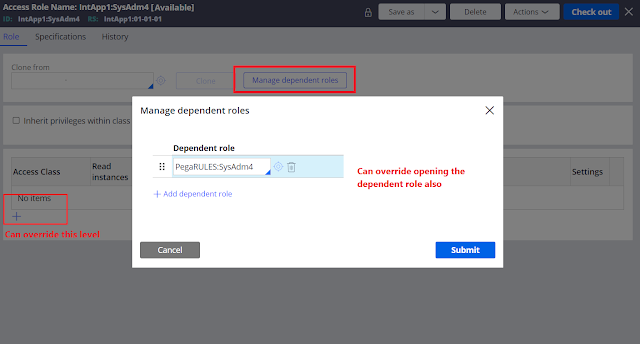
Permission inheritance and dependent roles


Pega Platform allows developers to simplify permission management by inheriting access control settings from parent classes, which allows you to override only the permissions that need customization while keeping other permission settings in their default configuration.


When creating a new application, Pega Platform creates access roles for administrators, authors, managers and users. Each application specific role inherits from a standard access provided as part of core Pega Platform functionality. Standard access role from which permissions are inherited is called a dependent role.

Standard access roles 


By default, Access Role Name records reference at least one standard role as a dependent role. For example, the <ApplicationName>:Authors created for application is based on standard PEGARULES:SysAdmin4 role which lists the default access control settings for application developers.

Some of the standard access role provided with Pega platform are listed in the following table.


Question

Service Agents at a marina belong to two access groups that inherit permissions from different dependent roles: Service Agents inherit permissions from the PegaRULES: User1, and Service Managers inherit from PegaRULES: WorkMgr4.
Application requirements state that Service Agents and Managers can view data in Marina-Service-Data-Painting and Marina-Service-Data-Repair. Only the Service Managers can delete data from Marina-Service-Data-Painting and Marina-Service-Data-Repair.
What is the best approach to implement this requirement?

Configure an Access of Role to Object (ARO) record in Marina-Service-Data- class to include the Service Manager's delete permissions. 

Wednesday, April 5, 2023

Case Locking

Types of Case Locking in Pega


There are two types of case locking in Pega infinity

  1. Default Locking
  2. Optimistic Locking
Default locking is where only one operator can view/update a case at a time the default value of the lock time is 30 mins. Optimistic locking is where multiple operators are allowed to work on the same case but only one use is allowed to update/submit the case at a time.
For example, let's say there are 3 operators working on the same case simultaneously,

Operator 1 - viewing the case
Operator 2 - viewing the case
Operator 3 - Updates/Submits a screen

--> There will be notifications on the screens of the operators 1 and 2 saying that this case is being updated by Operator 3, Refresh the screen to get latest updated values.

This can be configured on Case Settings > Locking screen


Sunday, April 2, 2023

Miscellaneous Topics


Pega Class related facts

https://www.youtube.com/watch?v=hA7lTYaDroQ&ab_channel=TechRidewithPK


Concrete vs Abstract classes


What is a class group?

As the name suggests it’s a group of classes. There may be multiple work classes inherited from Org-App-Work class such as Org-App-Work-ABC and Org-App-Work-XYZ.

There are 3 options to select from in the drop down

·        Belongs to a class group – Will be mapped to an existing parent class. For example, Org-App-Work-ABC class can be mapped to Org-App-Work class group.


·        Is a class group – If we select this option a new class group instance will be created in the name of the particular class. Which can be viewed from the records > Sysadmin > Class Group. Use this option if there is a large number of class instances created for the particular case time.


·        Does not belong to a class group – Usually this option is selected for data classes so that we can have a dedicated table. But we cannot select this option for Work classes.

 (Make sure you define key in the class group)


Test Connection


We find the mapped database table in the Records > SysAdmiin > Database Table


 External Mapping

We don’t need to explicitly map properties in the external mapping table. If the property name does not change PRPC will automatically map the columns in the table. This mapping will automatically be handled by PRPC when property optimization is done for a page property, where additional property will be made in the class and will be assigned to it.


How to map a class to a different database table?

1.     1. Create a database table from sql

2.     2.    Create menu > SysAdmin > database table à Provide the class        name for both the fields and create and open.

3.     3. Specify the Table name and save

4.     4.  Save the class instance


Obj- Refresh-And-Lock method

https://pegalearnings.blogspot.com/2019/06/obj-refresh-and-lock-method-in-pega.html?sc=1679545569985#c4148323625021409945

summary

Obj-Open method can be executed with or without acquiring lock. For example, if we just want to read the record we can open the object without acquiring a lock.

But if we want to Update the record we must acquire the lock. Here, the WO we are trying to acquire the lock may be already acquired by someone else. In this case if we just use the Obj-Open method with lock option checked it will fail the step as the lock cannot be acquired.

Here is where the Obj-Refresh-And-Lock method comes into picture. As a solution to this problem we can,

1.      Open the object using the Obj-Open method without acquiring the       lock

2.      Call Obj-Refresh-And-Lock method and acquire lock (This method       will not do anything if the lock is already acquired)

3.      Do the necessary changes to the opened page

4.      Commit the page


Note that some of the steps are commented in the above screenshot. This is only to refer the methods used in the explanation.

Important considerations

·        Obj-Refresh-And-Lock method has a check box “ReleaseOnCommit” which has to be checked. Otherwise lock will be there forever. And make sure to commit after using this method.

·        We can view the records of instances which are locked using the class instances of System-Locks.

·        If we want to explicitly release the lock that has been acquired we can call the method Page-Unlock

·        When tracing the locks make sure to enable “Locking” check box in the tracer


---------------------------------------------------------------------

Forward Chaining and Backward Chaining


This concept is used in Declare Expressions

A+B = C

We can configure the DE to execute in two different ways in the Change Tracking tab

1.      Whenever the input value changes – Forward Chaining

2.      Whenever Used – Backward Chaining


Assignment | Worklist | Workbasket | Routing


Assignment is an instance of a class derived from Assign- base class. Assignments record a temporary condition of an open work object within an executing flow. In laymen terms Assignment is a Task.

Assignments are created by a flow operating on work object, but assignments are not themselves part of the work object. The system save data recording an assignment in instances of the Assign-Workbasket (pc_assign_workbasket) or Assign-Worklist (pc_assign_worklist)

(When an operator submits the assignment FinishAssignment activity will be executed)


Important properties of the Assign-Worklist/ Assign-Workbasket classes

1.     pxRefObjectKey (Key) – This property keeps the mapping to the             corresponding WO of the Assignment. i.e. pxRefObjectKey =             pzInsKey of the WO


2.        pxFlowName (Key)


3.       pxAssignedOperatorID


Where can you find the Assignment information in the clipboard?

newAssignPage – which comes under user pages


How to configure the UI when there is a delay in data loading? – Defer Load Content


This can be configured for dynamic layouts, repeating layouts, Table layouts or dropdowns

Enabling this will introduce a delay in loading or wait for user intervention like scrolling/ hovering to load data to the portal/ harness

This can be combined with pagination for more optimal performance.

Check in the General and Presentation tabs for the configurations


Access Control Mechanism

  • 1.      Role Based Access Control
  •      Attribute Based Access Control


Attribute Based Access Control

It provides more granular control on application more on security perspective

Example

I want to show all cases of my class to all users – use RBAC

Now if I want to hide few properties or mask few properties we use ABAC


Two rules we implement

  • Access control policy
  • Access control policy condition/ Access When


Actions


·        Read – user can open a case that meets policy conditions or view data for cases in the lists/reports or so on

·        Update – User can create case that meets policy conditions or update data for such a case

·        Delete – User can delete a case that meets policy conditioins

·        Discover – Can see limited information about a case that doesn’t meet read conditions but does satisfy discover policy conditions.

·        Property Read – User has restricted visibility to property values including property values with read and update access.

·        Property Encrypt – Property is encrypted in database, clipboard, logs and indexes if no property read policy obfuscates the property, the decrypted value is visible to user UI control


Enforcement Exceptions

1.      Can only be defined on instances of Assign- , Data-, Work- classes

2.      ACP defined on Data- are not enforced in search queries

3.      Only read policies are enforced in custom SQL

Prerequisites

pzCanManageSecurityPolicies previllege should be available.

We must checkIn the rule to apply the changes


MaskIdentity is Access Policy Condition in which there are when conditions to evaluate. In the property section define the properties along with what needs to be done.


Configuring A REST Connector

Connect-REST Using POST Method

Example of consuming a REST service using an activity with exception handling


Step 1 


Open the Connect-REST wizard through the following navigation

Configure > Integration > Connectors > Create REST Integration

Step 2

Run the wizard


(Here by default GET is selected uncheck and select POST and define a name for the resource)
The Resource name defined here will be name of the connector


In the following screen click on "+Add a REST Response" and click RUN in the pop-up screen button and submit. (Make sure to copy the request body before clicking on the run button)


We can do "Undo Generation" even after closing this window, if we find some error in the connector creation. For that navigate to Configure > Integration > Tools > Wizard Cleanup.


Step 3

Decide on the approach to invoke the connector and do the transaction For this below approach is used.


Upon click of the "Create Employee" button REST connector will be invoked sending the Name, Age and salary as request parameters. Once the response is received, case id is mapped to clipboard property ( in this example the response value returned is 2308

The below activity is called upon click of the "Create Employee" button.


Request and response will be in the ABC-IntApp1-Int-Employee-CreateEmployeeAPI class object which is the class of the temp page defined.

Error handling will be done by setting a message to page checking the response code.

Rule Delegation

 Summary of Rule Delegation The purpose of Rule Delegation is to make the rule available in the production environment for customization for...